Sunday, September 27, 2015

Web 2.0 Tool #4: Animoto

Animoto


Description: Animoto allows its users to create beautiful videos from pictures and video clips. Unfortunately, the subscription is expensive ($10 a month) and the free version of this site is very limited. Without a subscription, users are limited to a 30 second video (about 9 slides) with no formatting control. The image library that Animoto provides is insufficient. Students must resort to Google searches for photos to use, which I dislike. On the positive side, Animoto is very easy to use and comes with background music. It only takes a few clicks to upload pictures from your computer to the presentation.There are some great templates available on the free version. At the beginning of the year, students created Bio Poems in class. I took a Bio Poem created by a student and turned it into a video that looks beautifully done. Unfortunately, I had to cut the poem short because there was not enough room in the 30 second video to put all of the lines. Completing this project with students would be time consuming if they had to find  or take their own pictures. However, students would be able to quickly recreate their poems if the pictures they needed were already downloaded to the computer. Overall, I feel that there is not much teachers can do with the free version of Animoto. Thirty seconds is just not enough time. 

Web 2.0 Tool #3: Glogster

Glogster


Description: Glogster is a site that allows users to make glogs (interactive posters). While the site requires a paid membership, I have found it to be worth the small membership fee ($39 a year for 30 memberships). Not only does membership allow teachers to create an unlimited amount of glogs for students to view, but each student also has an account that they can use to create their own glogs. There are numerous templates available categorized by subject area for use or you can create your own. You have the option to make your glogs private or public. After picking a template, it is easy to input videos, audio clips, pictures, or text to make the topic come to life. Glogs can be used to introduce topics, review concepts, or assess student learning. The glog I created will be used as a review of the events we have studied in class. Students are able to study the information presented and watch the videos to review for the end of unit test. Using Glogster, teachers can reach many different learners.

Web 2.0 Tool #2: Prezi

Prezi


Description: Prezi is a free presentation software that allows users to make nonlinear slideshows. Including pictures and videos is easily done with the click of a few buttons. The site allows teachers to offer multiple methods of entry into a topic and meet different types of learners at their level. Prezi is easy to use, but can be somewhat time consuming if you want to create elaborate paths for your slideshow. This site offers students an alternative to PowerPoint that is easy to learn and use. Since the presentations are stored online, they can be accessed at anytime from any computer with Internet access. I created a Prezi for a 5th grade social studies lesson on Westward Expansion. Prezi allowed me to include relevant YouTube videos, pictures, text, and hyperlinks. Students can then watch the presentation again at home if needed, and it can easily be used as a study aid. Not only do students enjoy presentations using Prezi, they also love making their own slideshows. 

Friday, September 25, 2015

Web 2.0 Tool #1: PhotoPeach

PhotoPeach


Link to this example: http://photopeach.com/album/81msc1

Description: PhotoPeach is a picture sharing site that allows users to create interactive photo albums. The free version of this site allows users to upload 30 pictures, but with a paid membership, users can upload an unlimited number of pictures. Adding text to photos and music to the slideshow is quick and easy to do. The site comes with music options available. The text features are minimal, and it does not offer many options to move text around. The highlight of this website is being able to add multiple choice quiz questions to any picture. The slideshow pauses and gives students five seconds to click on their chosen answer. PhotoPeach then dings if students are correct or buzzes and shows the correct answer if students have chosen the wrong one. The uses of this software are endless. I chose to create a review slideshow of geometry terms. After a few review slides, students are able to answer a few multiple choice questions to help test their knowledge. Unfortunately, PhotoPeach does not have the ability to keep records of quiz answers given. Overall, this is a great way to put together a short slideshow presentation of different photos. 

Sunday, September 20, 2015

First Week of School Activities- Create Your Own Country

Create Your Own Country

To help create a supportive classroom environment, we like to complete many different team building activities. One of these is our Classroom Country project. As a class, we discuss that our classroom is like a country and we need to work together to help our country be the best it can be. We discuss what we value as a class- honest, hard work, patience, etc. We then discuss how flags are designed to represent the values and history of the country. For example, our flag has 50 stars to represent the 50 states, thirteen stripes to represent the 13 colonies, red to represent the blood shed for our freedom, etc. We look at about four different countries and their flags to learn more about symbols. Students are then broken into groups of two or three to design a flag that would represent their class. They are given a sheet of color meanings to help them. Students must create a flag and write a good paragraph describing their flag and what it means. We then read all about the flags and vote on one to represent us. This flag then hangs in our classroom for the year.


First Week of School Activity- Saving Fred

The new year always starts with high energy, nervous stomaches, and a million ideas running through my head. I love fresh notebooks, new markers, and sharp pencil points. The first week is always chock full of getting-to-know-you activities and team building games. I will be posting some of my favorite activities starting with Saving Fred.  Feel free to use any of the resources available.

Saving Fred
Materials Needed:
  • Gummy Worms (one per group plus extras to eat!)
  • Gummy Lifesavers (one per group plus extras to eat!)
  • Clear Cups (one per group)
  • Paper Clips (one per student)
  • Saving Fred PowerPoint
Procedures:
  1. Break students into groups of 3-5. Four works best.
  2. Each group gets the following set-up. Place a gummy lifesaver under an upside down clear cup. Then place a gummy worm on top of the cup.
  3. Every group member gets a paper clip to use.
  4. Go through the PowerPoint discussing each slide. Allow students time to complete the task. Then follow up with the reflection questions.


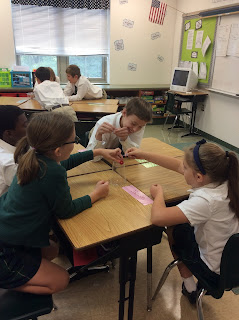
Can You Save Fred in action!